
 Image 1 of 5
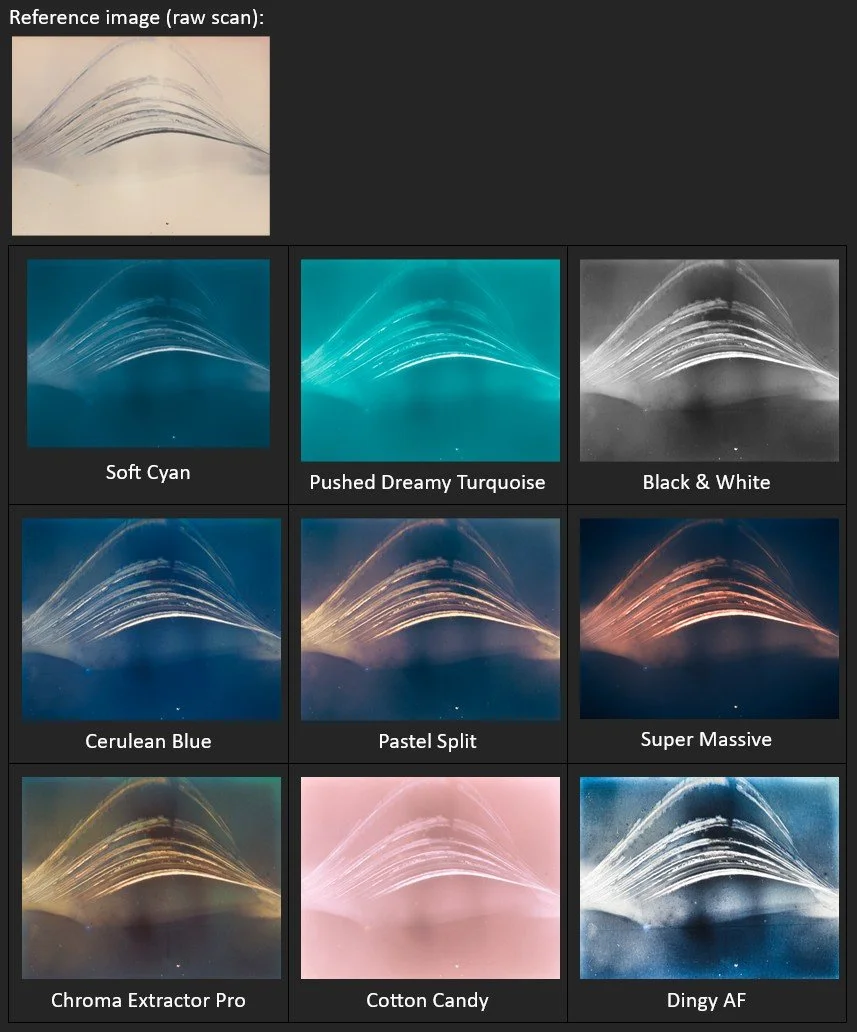 Image 2 of 5
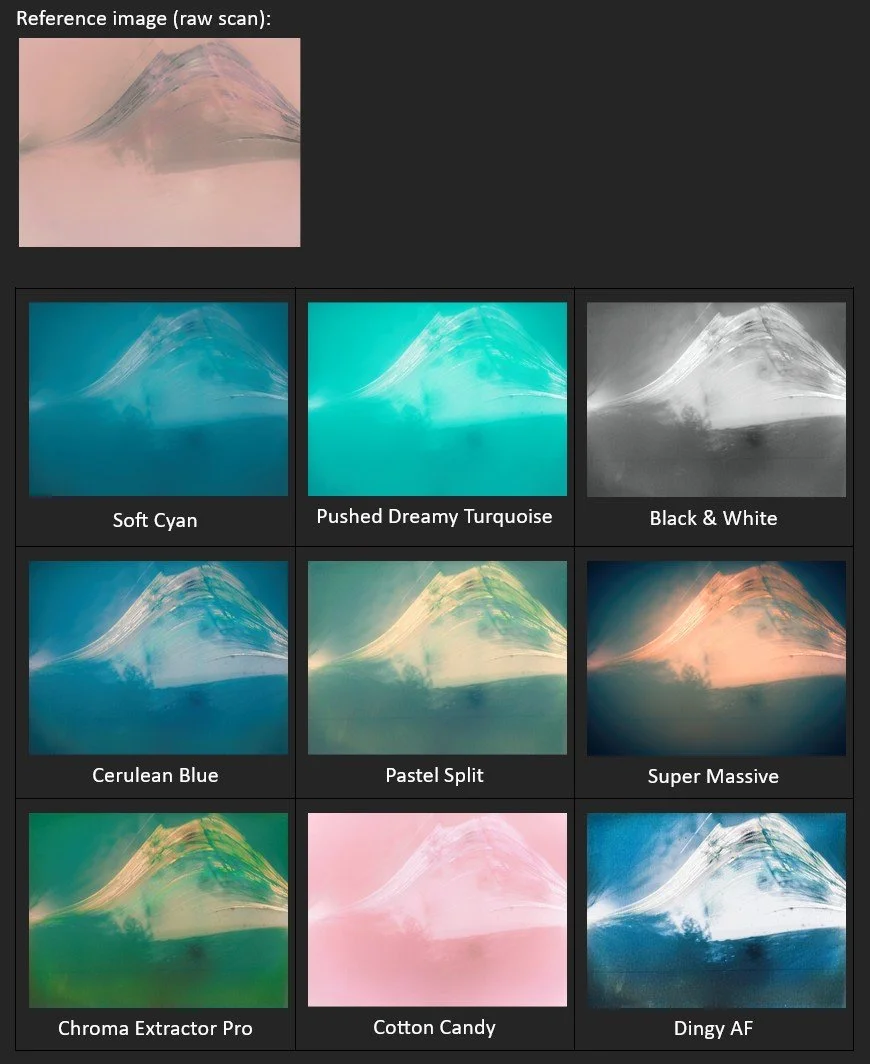 Image 3 of 5
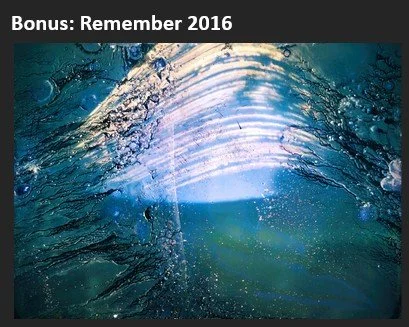 Image 4 of 5
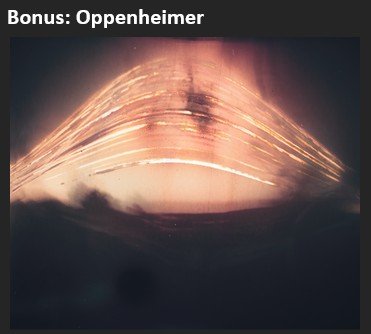 Image 5 of 5
To help you achieve better results more quickly after scanning you solargraphs, I’ve created this specialized preset pack that works in Lightroom, Photoshop and in Adobe Camera Raw (the one that opens from Bridge).
This pack includes:
11 Solargraphy presets.
Solargraph Preset Loader Photoshop action.
This readme installation and usage guide containing example images and preset descriptions.
Resize And Sharpen for the Web by Alex Nail, who unfortunately doesn’t offer this free useful tool anymore. Credits to Alex for creating this. I just love using it and recommend you do too.
One 16-bit solargraph scan so you can practice and test these right away*.
One 2,8GB Photoshop file with all named layers present so you can learn from what I’ve done.
Super Massive - Personal favorite. Named and inspired after what the Event Horizon Telescope first imaged of M87* in 2017.
Pastel Split - A softer, friendlier version with the same tonality: warmer highlights and cool shadows.
Cerulean Blue - Nearly untouched after inverting, but very slight split toning.
Soft Cyan - A velvety near monochrome version that would look stunning on Hahnemühle Photo Rag.
Pushed Dreamy Turquoise - Similar, but more greens allowed. The exposure has been pushed on this one.
Cotton Candy - My wife’s favorite and inspired by the cherry blossom in our garden that we’re both very fond of. It honors the original hue of the Ilford Multigrade paper as it darkens while being exposed, but not yet inverted after scanning.
Dingy AF - Entering the tool-based presets with this one quite as it increases Texture, Clarity and Dehaze, while balancing Contrast, Sharpening and especially Saturation. It’s the most extremely pushed solargraph preset in this pack for finding luminosity based detail that could be lost over the months. This one especially demands 16-bit scans and preferably with CCD-type scanners.
Chroma Extractor Pro - Think of this preset as the color version of the previous preset. This will find RGB values and attempts to drive them further apart. To me, this and the one before are not the most beautiful presets as is, but are very useful for further processing and/or layering and playing around with blending modes in Photoshop. A tip for additional color definition for Photoshop users: apply a Curves adjustment layer to the result of this preset. Then go to its settings in the 3-line hamburger menu and select Auto Options. Then cycle through the various radio buttons and settle on the one that shows the most variation in color. Set that layer’s blending mode to Color if you don’t like the resulting contrast. I often use this technique to get a wider variety of colors without the image looking too digital (the HSL sliders will do that for you).
Black & White - A good starting point for a black and white version that’s not too processed. Also recommended is combining this with any other preset and putting this one’s blending mode on either Luminosity or Overlay (more extreme) to instantly increase the contrast and saturation of the layer below it.
Bonus: Remember 2016 - This preset is not in the action set, but is included among the presets. I used a wildly different process to develop my solargraphs back then, but this one aims to emulate that 2016 look, while having updated the processing to the new standard. The result is a slightly more saturated, less noisy and more defined image. Hope you like it.
Bonus: Oppenheimer - A very creative interpretation with dominant reds and yellows. I was aiming for the appearance of a nuclear test, while fading the shadows enough to suggest age. I recommend not to clone out too much of the film damage for added character. This is the basis of the Within the Blast Radius project. Just know that a lot more went into those than just a preset, even though the above image is pretty close to the finished work.
May it serve you well as you engage in this fun photography project!
To help you achieve better results more quickly after scanning you solargraphs, I’ve created this specialized preset pack that works in Lightroom, Photoshop and in Adobe Camera Raw (the one that opens from Bridge).
This pack includes:
11 Solargraphy presets.
Solargraph Preset Loader Photoshop action.
This readme installation and usage guide containing example images and preset descriptions.
Resize And Sharpen for the Web by Alex Nail, who unfortunately doesn’t offer this free useful tool anymore. Credits to Alex for creating this. I just love using it and recommend you do too.
One 16-bit solargraph scan so you can practice and test these right away*.
One 2,8GB Photoshop file with all named layers present so you can learn from what I’ve done.
Super Massive - Personal favorite. Named and inspired after what the Event Horizon Telescope first imaged of M87* in 2017.
Pastel Split - A softer, friendlier version with the same tonality: warmer highlights and cool shadows.
Cerulean Blue - Nearly untouched after inverting, but very slight split toning.
Soft Cyan - A velvety near monochrome version that would look stunning on Hahnemühle Photo Rag.
Pushed Dreamy Turquoise - Similar, but more greens allowed. The exposure has been pushed on this one.
Cotton Candy - My wife’s favorite and inspired by the cherry blossom in our garden that we’re both very fond of. It honors the original hue of the Ilford Multigrade paper as it darkens while being exposed, but not yet inverted after scanning.
Dingy AF - Entering the tool-based presets with this one quite as it increases Texture, Clarity and Dehaze, while balancing Contrast, Sharpening and especially Saturation. It’s the most extremely pushed solargraph preset in this pack for finding luminosity based detail that could be lost over the months. This one especially demands 16-bit scans and preferably with CCD-type scanners.
Chroma Extractor Pro - Think of this preset as the color version of the previous preset. This will find RGB values and attempts to drive them further apart. To me, this and the one before are not the most beautiful presets as is, but are very useful for further processing and/or layering and playing around with blending modes in Photoshop. A tip for additional color definition for Photoshop users: apply a Curves adjustment layer to the result of this preset. Then go to its settings in the 3-line hamburger menu and select Auto Options. Then cycle through the various radio buttons and settle on the one that shows the most variation in color. Set that layer’s blending mode to Color if you don’t like the resulting contrast. I often use this technique to get a wider variety of colors without the image looking too digital (the HSL sliders will do that for you).
Black & White - A good starting point for a black and white version that’s not too processed. Also recommended is combining this with any other preset and putting this one’s blending mode on either Luminosity or Overlay (more extreme) to instantly increase the contrast and saturation of the layer below it.
Bonus: Remember 2016 - This preset is not in the action set, but is included among the presets. I used a wildly different process to develop my solargraphs back then, but this one aims to emulate that 2016 look, while having updated the processing to the new standard. The result is a slightly more saturated, less noisy and more defined image. Hope you like it.
Bonus: Oppenheimer - A very creative interpretation with dominant reds and yellows. I was aiming for the appearance of a nuclear test, while fading the shadows enough to suggest age. I recommend not to clone out too much of the film damage for added character. This is the basis of the Within the Blast Radius project. Just know that a lot more went into those than just a preset, even though the above image is pretty close to the finished work.
May it serve you well as you engage in this fun photography project!
